Welcome
How to navigate this class
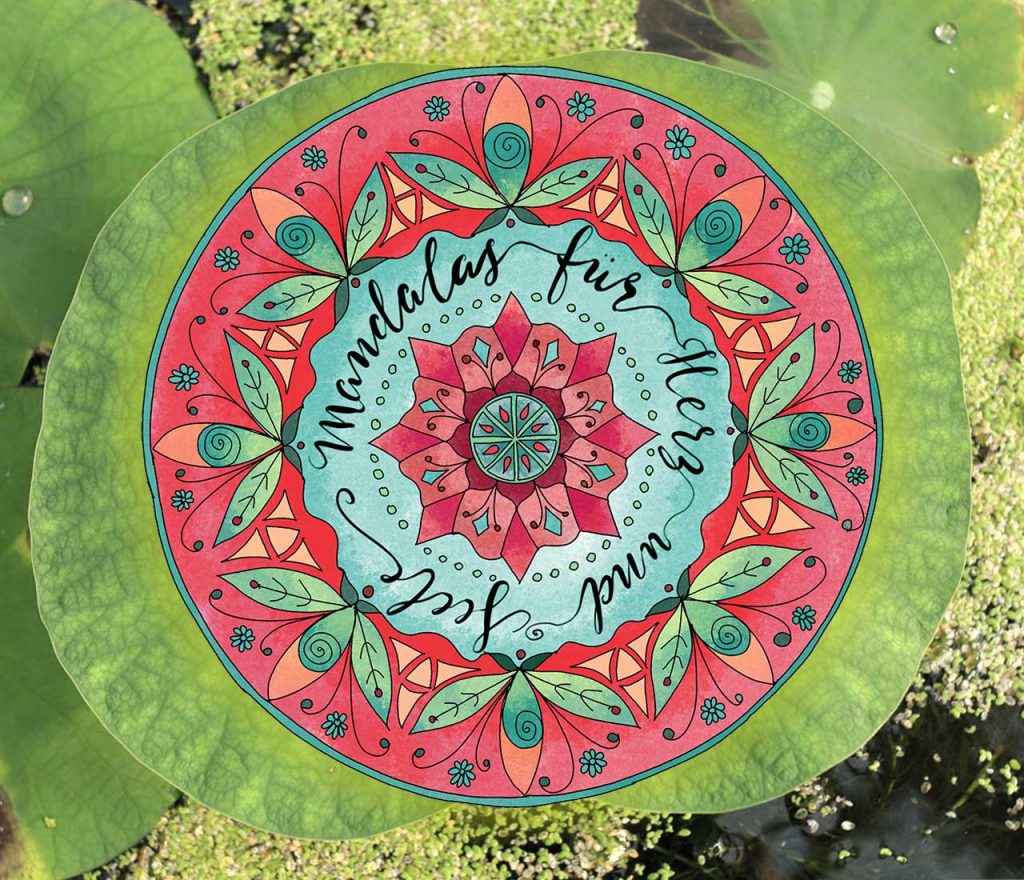
Here and now your personal journey into the world of Mandalas starts.
If you have any questions please contact me via Email
How long do I have access to this class?
You have lifetime-access to this class.
Which materials do I need?
I arranged a detailed material list for you, which you can view on this page or also download the short version.
Blogging about this class or sharing in social networks?
If you like feel free to share your creative process of your artwork with others.
I would appreciate it if you link my webpage www.simonesass.de or tag me on social networks:
Instagram @simone.sass.art
or use the hastag #mandalasforheartandsoul.
Copyright
A lot of heart and time has gone into this course, this course with all its text, images and videos is for your personal use only.
You are welcome to share your own work on the web, but please do not share any content from this course.
Please do not share this course or access with other people, this access is only for you personally.
Thank you!
Material
For creating Mandalas you only need a few materials, a sheet of paper and a pen is already enough.
Although I will show you what kind of materials I use in this class and you decide whatever material you like to use, or which one you maybe already have on hand or which things you like to have on top.
There are lots of different brands for material outside with different prices and qualities. I will list some of my favorite pens. All the brands and articles I am mentioning are NOT paid advertisement. They are only the things I personally like to use.
In my art I am using rather high-quality products. In my opinion it is more substainable and it is also about appreciating yourself and your art. Very cheap products often have the disadvantage, that they are produced under ethical very bad conditions and they also often have a rather bad quality.
I encourage you to buy rather only a few pens with a good quality than a whole bunge of material with less quality. And if you already got some material, use what you have on hand.
My tipp: watch those lessons first before you get all the materials that are listed. Maybe there are some ideas and materials you like better than the others.
So lets start with the Basics:

Paper, Pen & Co.
To create a structured black and white Mandala you need: a sheet of paper, a pen, a compass or any other round object, a pencil and optionally a ruler, a set square and an eraser.
Some thoughts about the paper
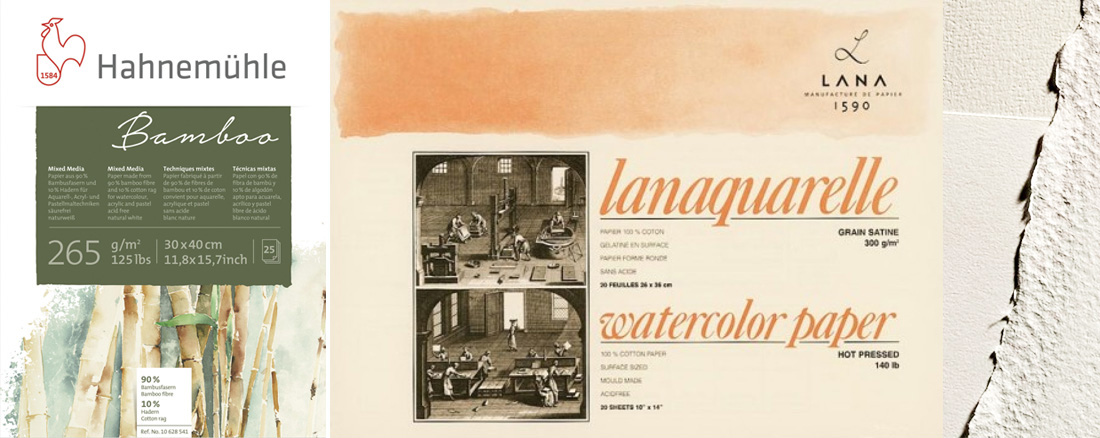
I recommend to use a paper which is made for watercolors, like a heavier paper about 260 g/ 125 lbs or more. Watercolor paper or mixed media paper suits the best. I like to use the Bamboo Mixed Media Paper from Hahnemühlen, which has a slightly grained texture, or a hotpressed watercolor paper like the one from LANA Lanaquarelle. Hotpressed watercolor paper has a smoother surface than coldpressed watercolor paper.
Best is to try out if you like to use a paper with a more structured and rougher surface or one with a smoother surface. Espacially the fineliner pen reacts very different depending on the structure of the surface. Most of the artstores have paper swatches, you can take gratis at home or try them out on location. It is really worth to try out what fits best for you.
Which pen fits best
Generally every pen works for drawing Mandalas. Even with a common ball-pointpen you can create beautiful Mandalas. For this class I recommend a waterproof pen, like a fineliner or a felttiped pen with a pretty fine tip.
Most of the time I use waterproof pens, so I have the opportunity to color my Mandala afterwards with watercolors. Whereas I can easy use my watercolors on top of a waterproof pen, a water-soluble pen would certainly dissolve by adding water and smear. There are lots of brands that offer waterproof fineliner, and also here I recommend to try out, which one fits best for you and which brand you can easy get at your local art supply store.
Those fineliner come in different sizes from very fine ones like 01 (0,25 mm ) or even 003 up to 08 (0,5 mm). I mostly adapt the size of my pentip to the size of my Mandala. If i create a Mandala on a sheet of paper that is maybe only about 10 x 10 cm (4 x 4 inch) I use a fineliner like the 01, if I create on a large sheet of paper, like 50 x 50 cm (20 x 20 inch) I would rather use the 08 fineliner.
In this class I mostly use a size of about 20 x 20 cm (8 x 8 inch) and I use my fineliner Sakura Pigma Micron 01 or my Sakura Pigma Micron PN, which is more like a waterproof felttipped pen. I recommend this PN pen especially for those of you who press the pen a little bit harder into the surface, because those felttipped pens are more robust than the fineliner tips. I really like those PN Pens.
Most of the fineliners come also in different colors, I use a black one in this class, but feel free to draw your Mandala with a different color.

Additional material
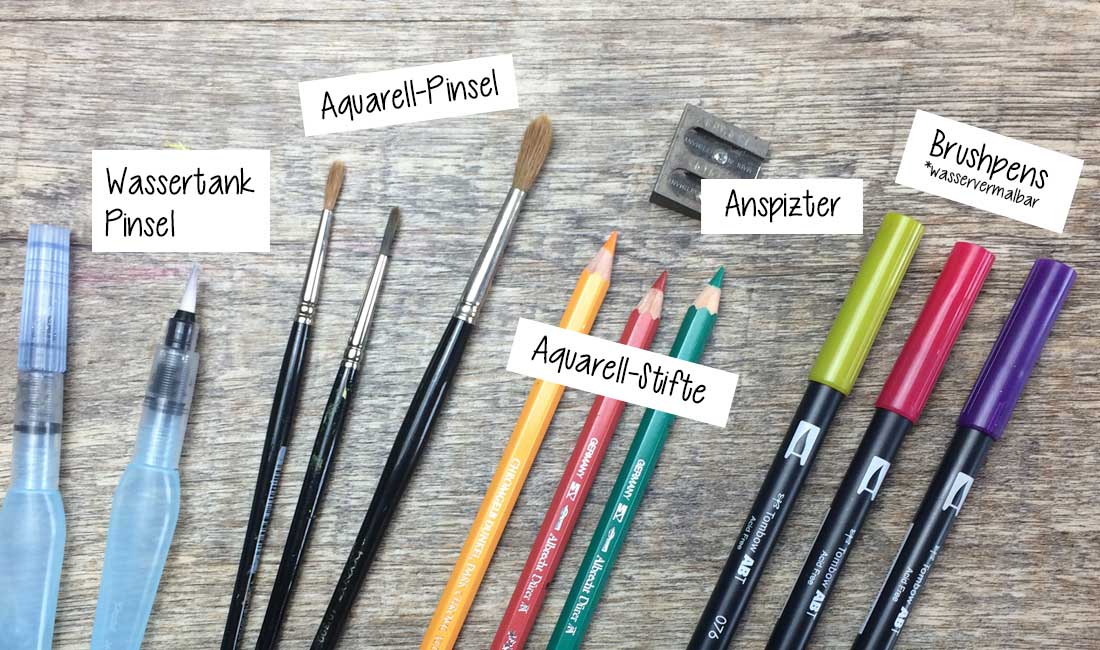
In order to draw the basic template or grid for your structured Mandala you also need a pencil and a compass or if you don’t have a compass you can use different round objects. If you have on hand you also can use a ruler and a set square. But you can also do without those measuring instruments and draw your lines freehand.
Also an eraser is nice to have to erase the grid or template of your Mandala later on, thats the only time we will need that eraser.
Material for coloring

In this class I will show you two techniques how to color your Mandalas – one with watercolor pencils and the other one with brush pens. In my experience there might be one way you might prefere more, so maybe just watch both techniques before you buy all the material.
Brushes
I am using to different kinds of brushes in this class, a traditonal round brush for watercolors and also an aquabrush pen, which is a pen with an integrated watertank. Both techniques can be done with the brush you prefer, either the traditional brush or the aquabrush pen.
Just like the tradional brushes aquabrush pens also come in different sizes, mostly there are three different ones, small, middle and large. I recommend to use a small or medium one with a round tip. The range of different tradional brushes is huge. I use also a smaller round brush so I can easily color the smaller details of my Mandala. Mostly I use a second bigger brush for the larger areas.
You can find watercolor brushes with synthetic hair or natural hair from the male kolinsky sable. For the coloring techniques in this class it is absolutly adequate to use a synthetic brush, because they are much cheaper than the kolinsky sable brushes. The most important is that you feel comfortable with your brush and since there are so many different kinds of brushes out there I again recommend to go in an art supply store and really feel those brushes, instead of getting them from the internet. And I would dissavise you from really cheap watercolor brushes in my experinence they tend to loose their hair and so you will have always those fine hairs on your mandala and to get rid of those hair mostly leaves stains on your colored Mandala. So get you a better quality brush, which are also not very expensive.
Watercolour pencils
One of the techniques I will introduce you to is coloring with watercolor pencils. Watercolor pencils are water-solubale pencils that are actually watercolor in pencil form. So you can dissolve them completely with water and they act like traditional watercolur paint. I use the watercolor pencils from FABER CASTELL Albrecht Dürer, which you can buy in sets or single ones.
You will see in my video about coloring with watercolor pencils that you can color a vibrant Mandala easily with only 4 or 5 different colors. So you don’t have to have a whole bunch of different colors to get a vibrant and mulitcolored Mandala. You can just try out with a few pencils if this techniques fits for you.
Of course there are some other very good brands of watercolor pencils, like for example DERWENT und CARAN-d-ACHE and much more.
Brush pens

Another possiblity for coloring your Mandalas is coloring with water-soluble brush pens. Brush pens are pens with a brush tip, where you can vary the thickness of your stroke by pressing harder or lighter. For my Mandalas I use water-soluble brush pens, in this class I use the TOMBOW® ABT Dual Brush Pen, which are high quality brush pens with two different tips, one brush tip and a felttipped pen tip, which I actually don’t use for coloring Mandalas. So there are also a lot more brands of brush pens like SAKURA® Koi Coloring Brush Pen or Talens ECOLINE® Brush Pen Marker. So just use whatever brush pens you like or already have.
For the technique I show you in this class it is good to use water-soluble brush pens and not waterproof brush pens.
Because you can buy most of thosebrush pens also as a single pen, feel free to try out different brands to find your favourite pen.
Gelly Pens & Co

In order to embellish my colored Mandala I like to use some pens to add some more colors and details. I like adding colors like gold, white and sometimes some glitter. If you like to embellish your colored Mandala a little bit more, opaque pens are really suitable for that, like gelly pens or marker like Posca Pens. If you love glitter and sparkle you should try out the Pentel Dual Metallic Gelpens. To embellish in golden tones I like to use the Sakura Pen Touch Marker.
[edgtf_icon icon_pack=“font_awesome“ fa_icon=“icon_star“ size=“edgtf-icon-tiny“ custom_size=““ type=“normal“ border_radius=““ shape_size=““ icon_color=““ border_color=““ border_width=““ background_color=““ hover_icon_color=““ hover_border_color=““ hover_background_color=““ margin=““ icon_animation=““ icon_animation_delay=““ link=““ anchor_icon=““ target=“_self“] TIPP:
I like to encourage you to buy your materials at the local art supply store. I think it is much nicer to really feel the material and to try it out. Especially colors are not represented correctly and authentic in the internet and so you might get a different color like you had wished.
Also the surfaces of papers are so different, that it is a lot nicer to try out how the fineliner or other pens react on that certain paper or how does the color application feel on that paper. I already couldn’t handle a certain technique only because the paper actually couldn’t handle that technique. As soon I tried out another paper i really liked that technique and it worked fabulous.
Another possibility is to just ask friends of yours, if they have material you can try out. And I already mentioned a couple of times, maybe get you for a start only a few of those pens, you can always get you some more if you like that kind of material and the technique.
So now you can also download a list of all the materials I just mentioned
[edgtf_icon icon_pack=“font_awesome“ fa_icon=“icon_download“ size=“edgtf-icon-tiny“ custom_size=““ type=“normal“ border_radius=““ shape_size=““ icon_color=““ border_color=““ border_width=““ background_color=““ hover_icon_color=““ hover_border_color=““ hover_background_color=““ margin=““ icon_animation=““ icon_animation_delay=““ link=““ anchor_icon=““ target=“_self“] DOWNLOAD
The world of Mandals
A little introduction
The word „mandala“ comes from the ancient Indian language Sanskrit and means disc, or magic circle. The circle is not only the simplest mandala, but also the basic form of all mandalas. Although this circle can also include other shapes, such as squares or triangles, the circle remains the most important element of a mandala, even if it is enclosed by another shape.
The mandala circle is also called the primordial symbol of all existence. It is the symbol of the sun as the source of light and the symbol of the full moon as the guardian of dark secrets.
In symbolic language, the circle is the resting center of our spinning world, it protects the sacred space where we find peace and tranquility, it limits and protects. The circle is also called the wheel of life, a symbol of absolute perfection and eternity. Because the circle has no beginning and no end and each point of the circle has the same distance from the center.
Without a circle there is no mandala. However, once the circle is drawn, other shapes, elements and symbols can follow.

Mandalas and their tradition
Mandalas are seemingly as old as mankind, they can be seen in the very first symbols made by human hands. Mandalas are important elements of many spiritual traditions, such as Buddhism and Hinduism. However, mandalas play an important role not only in Eastern traditions, but also in Western religious art. One of the most famous symbols is the Celtic cross, a symbol even older than Christianity. In the religious art of Islam, the symbol of the circle segment, the crescent moon, and a complete circle in the form of a star can be found.
In the three great Indian religions, Hinduism, Buddhism, and Jainism, the mandala is central to many meditation practices.
Why creating Mandalas.
Mandalas are not just beautiful colourful artistic creations, they communicate with their symbolism directly with the subconscious and stimulate our soul and reveal what is hidden. Creating a mandala expresses the innermost and not what is related to a thought process. Mandalas are expressions of deep levels of consciousness. In drawing mandalas we can access the levels of consciousness within ourselves and our intuition.
Not only the process of drawing itself leads to a state of harmony between body, mind and soul and a deep contentment and calmness, but also the symbolism can reach this new consciousness.
What is important when drawing and painting Mandalas
A mandala should always come out of intuition and not planned or a conscious effort. The focus is on the process not the result. Mandalas arise from the subconscious, so try to switch off your thoughts and just draw what arises in your mind’s eye.
But don’t try to force anything, if you feel that no symbols or elements are rising in you that is not a failure, sometimes things are not so obvious, just keep drawing and stay in the flow and enjoy drawing. Not every mandala has to feel good or have an obvious deep meaning, you can always create a new mandala. Let go of the mandala but don’t destroy it, if you look at it again later, weeks, months or years later, the effect of the mandala on you may be completely different. Therefore, I recommend dating your mandalas, it is often very surprising how you look at the mandala and its moment with distance.

Discovering Mandalas
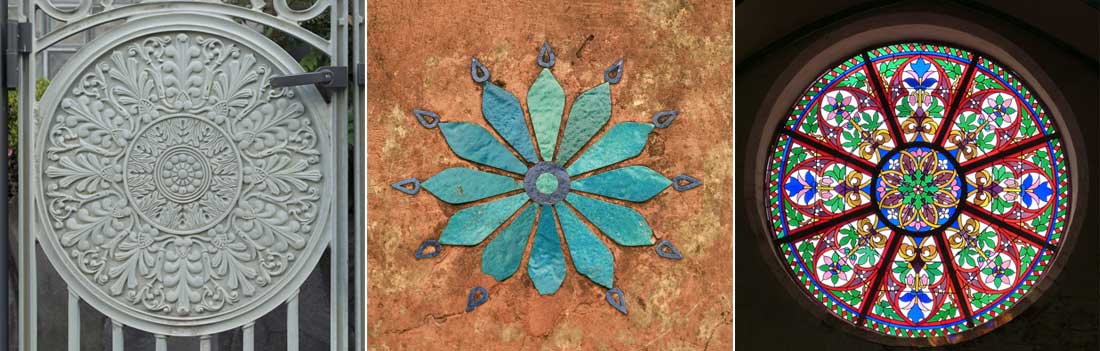
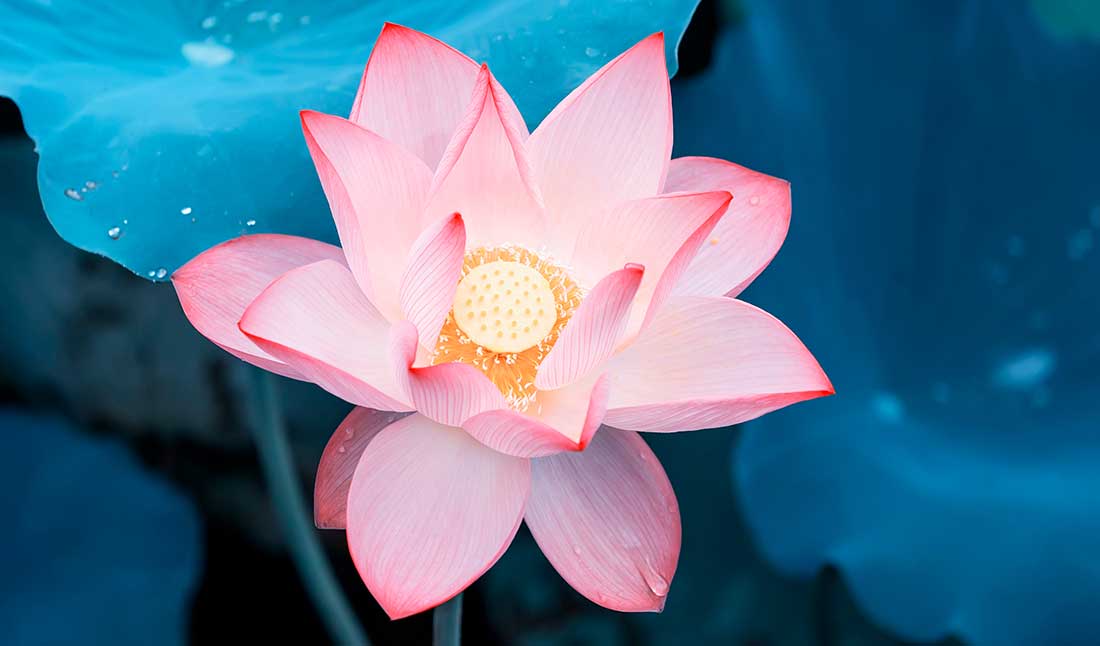
Look at the world around you, with all its details. Mandalas will appear to you everywhere. Mandalas that reveal themselves to us when we take the time to discover them. Use this new perspective to inspire you. See what shapes, symbols, elements appeal to you. Take every opportunity to absorb the inspirations, make photos or sketches. Perceive without judging.
LESSON 1
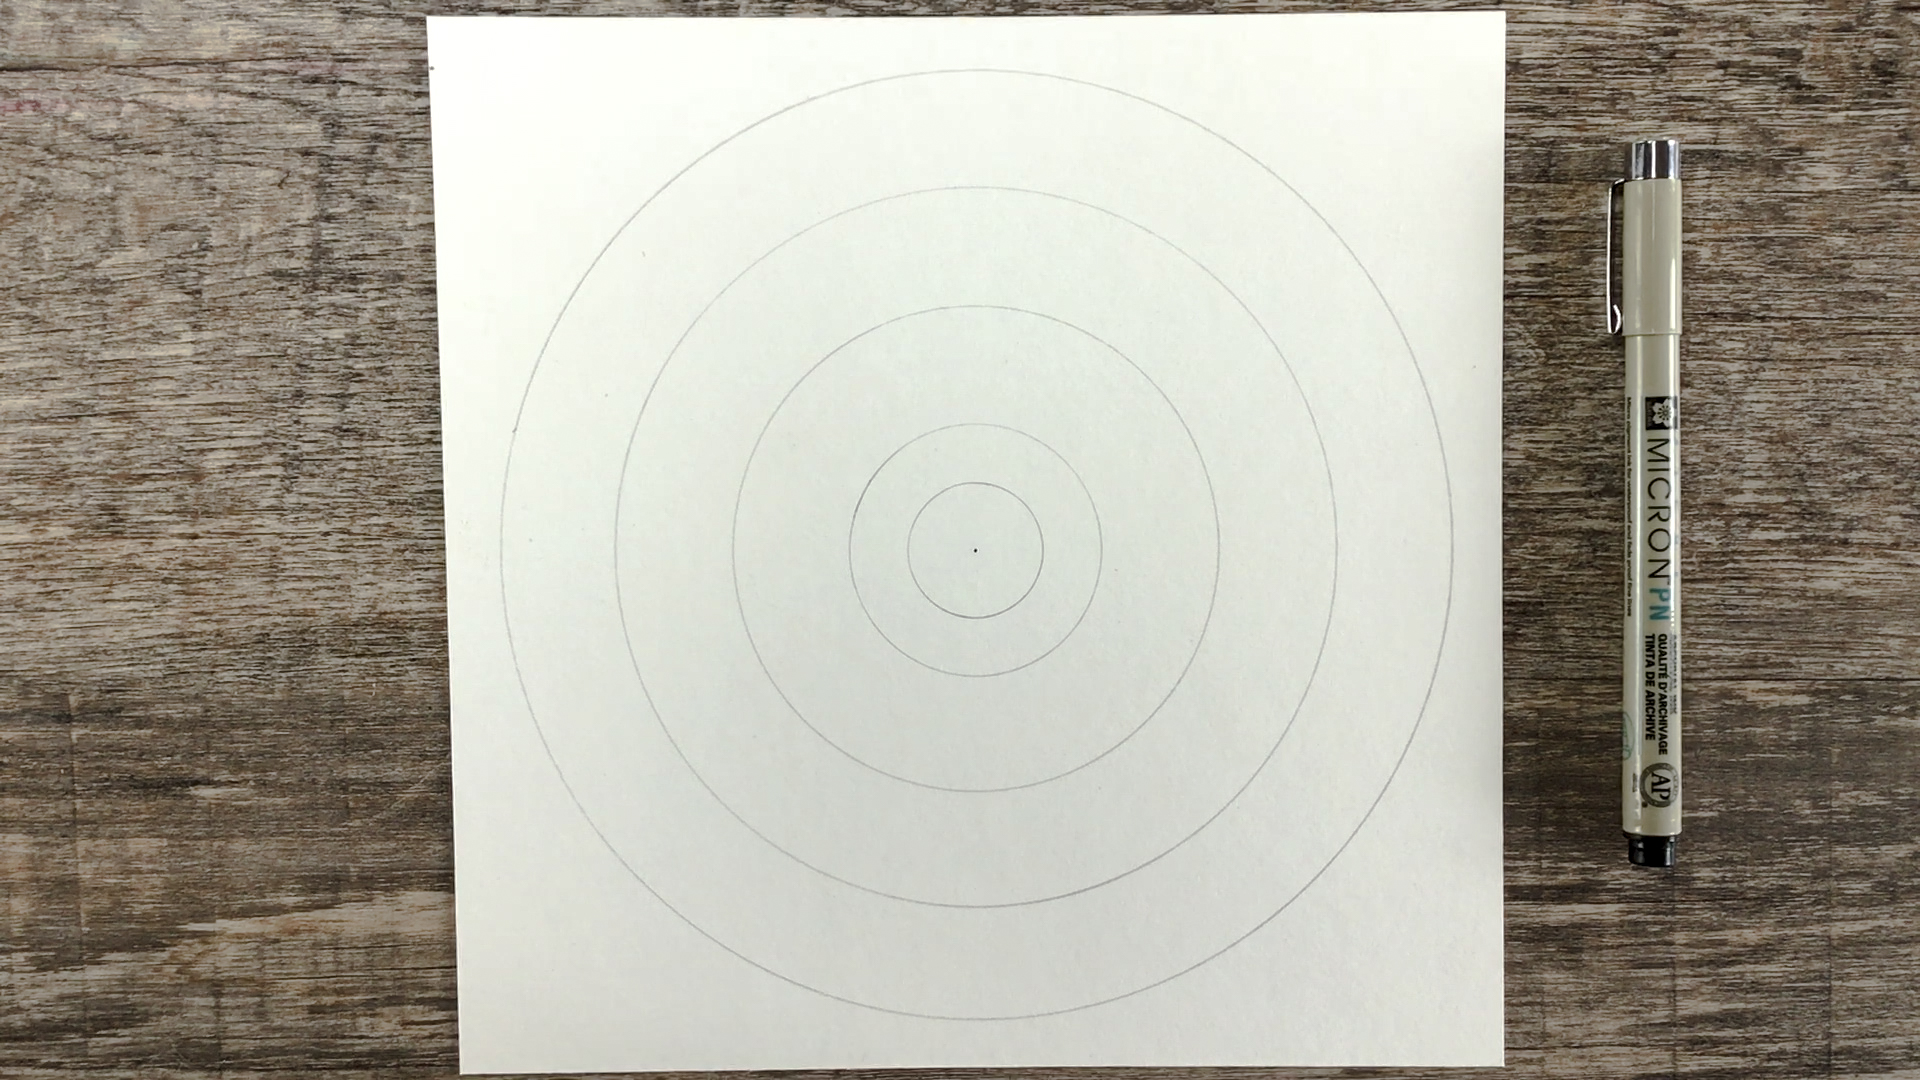
Start with a circle
A structured mandala, as the name suggests, is oriented towards a kind of structure, a formal framework with a structure oriented towards the centre. This framework is a very helpful tool for a symmetrical mandala. This basic framework is the basis of our first mandala.
Especially at the beginning of creating mandalas, this basic framework is like a little safety net that can give a little more confidence when drawing mandalas. Here I show you the structure of a basic framework for a so-called eight-point mandala.
[edgtf_icon icon_pack=“font_awesome“ fa_icon=“icon_pencil“ size=“edgtf-icon-tiny“ custom_size=““ type=“normal“ border_radius=““ shape_size=““ icon_color=““ border_color=““ border_width=““ background_color=““ hover_icon_color=““ hover_border_color=““ hover_background_color=““ margin=““ icon_animation=““ icon_animation_delay=““ link=““ anchor_icon=““ target=“_self“] Material
Watercolour- oder mixed media paper, I use Hahnemühle Bamboo Mixed Media Paper 265 g/m² / Pencil/ Compass / optional: Ruler / optional: Set Square
[edgtf_icon icon_pack=“font_awesome“ fa_icon=“icon_star“ size=“edgtf-icon-tiny“ custom_size=““ type=“normal“ border_radius=““ shape_size=““ icon_color=““ border_color=““ border_width=““ background_color=““ hover_icon_color=““ hover_border_color=““ hover_background_color=““ margin=““ icon_animation=““ icon_animation_delay=““ link=““ anchor_icon=““ target=“_self“] Tipp
Of course, you can also use or design other structured templates. A simple variation is to increase the eight units of the eight-point mandala to more units, such as 12, 16 or even more, or to reduce them to six or even four units.
There are also many other ways to create an even more complex basic structure. I mostly use this simple version of a basic framework, as it is quick and easy to create and requires little material. The simpler I can start, the more I can relax.
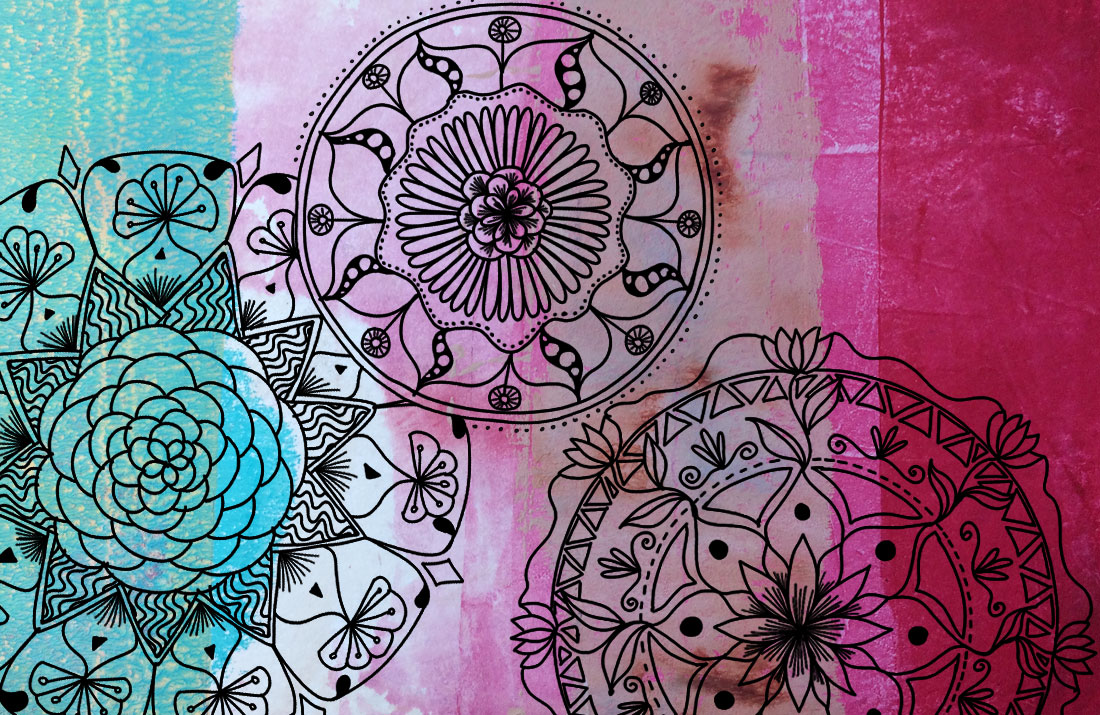
A Mandala with Lotus Petals
Let’s start our first eight-point mandala. The basic framework we have created will now be brought to life with a shape that is very often used in mandalas, the lotus blossom.
To do this, I will first show you how to draw the shape of the lotus blossom very easily.
The lotus petal shape
[edgtf_icon icon_pack=“font_awesome“ fa_icon=“icon_pencil“ size=“edgtf-icon-tiny“ custom_size=““ type=“normal“ border_radius=““ shape_size=““ icon_color=““ border_color=““ border_width=““ background_color=““ hover_icon_color=““ hover_border_color=““ hover_background_color=““ margin=““ icon_animation=““ icon_animation_delay=““ link=““ anchor_icon=““ target=“_self“]Material
Black fineliner / Sheet of Drawing- or copypaper
[edgtf_icon icon_pack=“font_awesome“ fa_icon=“icon_star“ size=“edgtf-icon-tiny“ custom_size=““ type=“normal“ border_radius=““ shape_size=““ icon_color=““ border_color=““ border_width=““ background_color=““ hover_icon_color=““ hover_border_color=““ hover_background_color=““ margin=““ icon_animation=““ icon_animation_delay=““ link=““ anchor_icon=““ target=“_self“] TIPP:
Drawing different shapes on a sheet of scratch paper is also a very good warm-up before you start creating your Mandala.
Of course, you can also change the shape of the lotus flower by drawing the S-curves more curved or by drawing the flower wider or narrower. Try out on a sketch sheet which shape of the flower appeals to you most.

A Lotus Blossom Mandala
Now that you know how to draw a possible lotus flower shape, we will breathe life into our basic framework with this lotus flower shape. In this video I show you how to integrate the lotus flower into your basic framework.
[edgtf_icon icon_pack=“font_awesome“ fa_icon=“icon_pencil“ size=“edgtf-icon-tiny“ custom_size=““ type=“normal“ border_radius=““ shape_size=““ icon_color=““ border_color=““ border_width=““ background_color=““ hover_icon_color=““ hover_border_color=““ hover_background_color=““ margin=““ icon_animation=““ icon_animation_delay=““ link=““ anchor_icon=““ target=“_self“] Material
your already created framework / black waterproof fineliner
Embellishing the Lotus Petal Mandala
Now we already have a mandala made of lotus blossoms.
To give the mandala even more symbolism, even more subtle elements and even more personality, I will show you in this video how you can decorate your mandala even further.
Where these elements come from and especially how and by what you can be inspired – more about this in the next lesson.
[edgtf_icon icon_pack=“font_awesome“ fa_icon=“icon_pencil“ size=“edgtf-icon-tiny“ custom_size=““ type=“normal“ border_radius=““ shape_size=““ icon_color=““ border_color=““ border_width=““ background_color=““ hover_icon_color=““ hover_border_color=““ hover_background_color=““ margin=““ icon_animation=““ icon_animation_delay=““ link=““ anchor_icon=““ target=“_self“] Material
your Lotus Blossom Mandala / waterproof black Fineliner
LESSON 2
Getting inspired
Artistic creativity is unimaginable without inspiration. Inspiration is the process of finding ideas that then flow into creative work. Since everyone perceives things around them with their own eyes and thus interprets them very individually, these inspirations play a big part in finding one’s own style and, above all, one’s own authenticity.
In tEspecially in today’s fast-paced world, it is all the more beautiful to perceive things consciously again and to focus more on what is happening around you. A conscious deceleration of the mind and also a great deal of appreciation for the environment.
So take time for inspiration. And by that I mean inspirations in real life and not quick searches in the virtual world of the internet. Perceiving things in their real environment has a much deeper level than just seeing them in someone else’s picture. Even the environment that surrounds your inspiration makes you see this object with completely different eyes. You can also perceive harmonies or contrasts in form and colour and store these as inspiration.
I recommend that you capture your sources of inspiration directly on the spot, as you usually have a camera at hand via your smartphone. But quickly sketching the object that inspires you also has its charm, so you can give your inspiration your own personal style right away.
Don’t always try to capture everything true to nature and detail, interpret, abstract and change – let yourself be guided by your intuition.
[edgtf_icon icon_pack=“font_awesome“ fa_icon=“fa-commenting“ size=“edgtf-icon-tiny“ custom_size=““ type=“normal“ border_radius=““ shape_size=““ icon_color=““ border_color=““ border_width=““ background_color=““ hover_icon_color=““ hover_border_color=““ hover_background_color=““ margin=““ icon_animation=““ icon_animation_delay=““ link=““ anchor_icon=““ target=“_self“] Note
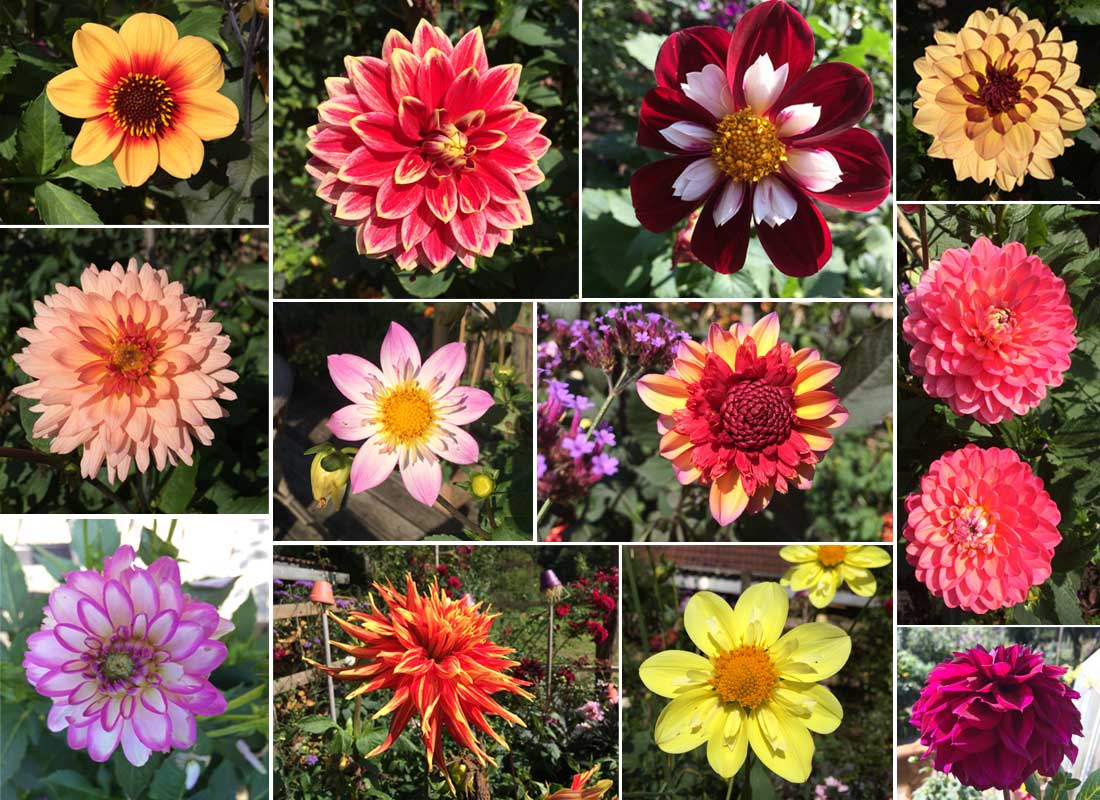
I had to smile afterwards about the part in the video where I rave about the variety of shapes and colours of the dahlias and at the same time hold exactly the dahlia variety into the camera that is not the most representative for the unbelievable spectrum of colours and shapes of dahlias.
At first glance, word and image do not create an obvious harmony 🙂 .
The reason is that I just can’t bring myself to cut off flowering plants, so I looked for a dahlia flower that had already been cut off – and that was the white spherical dahlia „Small World“.
But of course I don’t want to deprive you of the dahlia variety, the shapes and colours in my dahlia bed, so here are a few photos.
Create design templates
Growing a mandala through shapes, symbols and elements is the creative, relaxing and creative part. It is the time when you make your mandala personal by integrating symbols and shapes that have a specific – often subconscious – meaning for you.
To facilitate this process, I use self-created templates with different shapes, elements and symbols to help me draw my mandala. It is a kind of brainstorming and gathering of my inspirations, which I expand again and again by adding something new.
This template is not only helpful when you start drawing mandalas, but also when you have already created several mandalas. Sometimes shapes or elements that I have collected on one of my inspiration walks get forgotten – time to get out the design template and rediscover these things.
Most of the time, creating mandalas is a mixture of things that come spontaneously from the gut and also inspirations that you have collected on your template.
Design template „Shapes“
[edgtf_icon icon_pack=“font_awesome“ fa_icon=“icon_pencil“ size=“edgtf-icon-tiny“ custom_size=““ type=“normal“ border_radius=““ shape_size=““ icon_color=““ border_color=““ border_width=““ background_color=““ hover_icon_color=““ hover_border_color=““ hover_background_color=““ margin=““ icon_animation=““ icon_animation_delay=““ link=““ anchor_icon=““ target=“_self“] Material
Sketching- or Copypaper / black fineliner / your sources of inspiration
[edgtf_icon icon_pack=“font_awesome“ fa_icon=“icon_star“ size=“edgtf-icon-tiny“ custom_size=““ type=“normal“ border_radius=““ shape_size=““ icon_color=““ border_color=““ border_width=““ background_color=““ hover_icon_color=““ hover_border_color=““ hover_background_color=““ margin=““ icon_animation=““ icon_animation_delay=““ link=““ anchor_icon=““ target=“_self“] Tipp
You can also keep your template in the form of a small sketchbook.
[edgtf_icon icon_pack=“font_awesome“ fa_icon=“icon_download“ size=“edgtf-icon-tiny“ custom_size=““ type=“normal“ border_radius=““ shape_size=““ icon_color=““ border_color=““ border_width=““ background_color=““ hover_icon_color=““ hover_border_color=““ hover_background_color=““ margin=““ icon_animation=““ icon_animation_delay=““ link=““ anchor_icon=““ target=“_self“] DOWNLOAD
Inspiration guide „Embellishments“
[edgtf_icon icon_pack=“font_awesome“ fa_icon=“icon_pencil“ size=“edgtf-icon-tiny“ custom_size=““ type=“normal“ border_radius=““ shape_size=““ icon_color=““ border_color=““ border_width=““ background_color=““ hover_icon_color=““ hover_border_color=““ hover_background_color=““ margin=““ icon_animation=““ icon_animation_delay=““ link=““ anchor_icon=““ target=“_self“] Material
Sketching- or copypaper / black fineliner / your sources of inspiration
[edgtf_icon icon_pack=“font_awesome“ fa_icon=“icon_star“ size=“edgtf-icon-tiny“ custom_size=““ type=“normal“ border_radius=““ shape_size=““ icon_color=““ border_color=““ border_width=““ background_color=““ hover_icon_color=““ hover_border_color=““ hover_background_color=““ margin=““ icon_animation=““ icon_animation_delay=““ link=““ anchor_icon=““ target=“_self“] Tipp
Here are a few keywords into which categories you can structure your elements:
Flowers / blossoms / leaves / plants / seeds / geometric shapes / organic shapes / lines / symbols / spirals / dots / symbols.
Another way to collect your inspirations is to write them down individually on small pieces of paper like card indexes. This way you can easily sort your inspirations by themes and expand your collection again and again.
[edgtf_icon icon_pack=“font_awesome“ fa_icon=“icon_download“ size=“edgtf-icon-tiny“ custom_size=““ type=“normal“ border_radius=““ shape_size=““ icon_color=““ border_color=““ border_width=““ background_color=““ hover_icon_color=““ hover_border_color=““ hover_background_color=““ margin=““ icon_animation=““ icon_animation_delay=““ link=““ anchor_icon=““ target=“_self“] DOWNLOAD
Inspirations guide embellishments
LESSON 3
Structured Mandalas

Eigth-Point-Mandala
You already know how to grow and decorate a mandala from shapes, elements and symbols and you have also created your own design template.
Now I will show you how to create an eight-point mandala with the help of your design templates.
[edgtf_icon icon_pack=“font_awesome“ fa_icon=“icon_pencil“ size=“edgtf-icon-tiny“ custom_size=““ type=“normal“ border_radius=““ shape_size=““ icon_color=““ border_color=““ border_width=““ background_color=““ hover_icon_color=““ hover_border_color=““ hover_background_color=““ margin=““ icon_animation=““ icon_animation_delay=““ link=““ anchor_icon=““ target=“_self“] Material
Eigth-Point-Mandala template / waterproof black fineliner / inspiration guide „Shapes“ / inspiration guide „Embellishments“
[edgtf_icon icon_pack=“font_awesome“ fa_icon=“icon_star“ size=“edgtf-icon-tiny“ custom_size=““ type=“normal“ border_radius=““ shape_size=““ icon_color=““ border_color=““ border_width=““ background_color=““ hover_icon_color=““ hover_border_color=““ hover_background_color=““ margin=““ icon_animation=““ icon_animation_delay=““ link=““ anchor_icon=““ target=“_self“] Tipp
Of course, it is not a „must“ to use only elements from your template in your mandala.
The design templates are also a help to stay in the flow of drawing if you get stuck and don’t want to come up with a spontaneous idea for a shape.
Even if you have just created your design template and would now like to use it, it is quite possible that many new shapes will come to mind while you are drawing – just let it happen. Remember that your subconscious communicates with you when you draw. Your intuition accompanies you when you draw, always try to pay enough attention to it. And maybe you want to add these new shapes to your templates.
A Multi-Point-Mandala
A structured mandala does not need to have a certain division from the start, such as eight units, four units or 16 units. I can also allow myself the freedom to decide in each round of my mandala how many units my mandala may have.
This loosens up the structure a bit and yet my mandala keeps its symmetry.
Here, too, I use a basic framework as an aid. However, I only draw my circles around the centre and do without further divisions.
[edgtf_icon icon_pack=“font_awesome“ fa_icon=“icon_pencil“ size=“edgtf-icon-tiny“ custom_size=““ type=“normal“ border_radius=““ shape_size=““ icon_color=““ border_color=““ border_width=““ background_color=““ hover_icon_color=““ hover_border_color=““ hover_background_color=““ margin=““ icon_animation=““ icon_animation_delay=““ link=““ anchor_icon=““ target=“_self“] Material
Basic template only with circles / waterproof black fineliner / optional inspiration guides
LESSON 4
Mandala Doodles
The word „doodle“ comes from the English language and means something like doodle. Doodling has already become an art form. Doodles are simple drawings that have no obvious representative meaning; they are usually made of abstract shapes. A doodle artwork also reflects the feelings of the artist, feelings and thoughts are „doodled“ quasi intuitively on paper.
Doodles are often associated with casual phone doodling. In other words, an activity that takes place without focus on the process of drawing. With our mandala doodles, I would like to move away from this aspect and continue to recommend having the focus mindfully on each stroke so that you can continue to move into a relaxed state.
When we doodle a mandala, we do not need a structured framework to help us, but draw freely from the centre.
Of course, our mandala still has a structure, namely that of the circle, but still the doodling of mandalas feels more unstructured, more relaxed, more free and looser. You will see what I mean in a moment. Especially if you tend towards perfection, mandala doodling is a wonderful exercise to let go of perfection.
Mandala Doodles in a cirlce
[edgtf_icon icon_pack=“font_awesome“ fa_icon=“icon_pencil“ size=“edgtf-icon-tiny“ custom_size=““ type=“normal“ border_radius=““ shape_size=““ icon_color=““ border_color=““ border_width=““ background_color=““ hover_icon_color=““ hover_border_color=““ hover_background_color=““ margin=““ icon_animation=““ icon_animation_delay=““ link=““ anchor_icon=““ target=“_self“] Material
A sheet of (watercolor) paper, e.g.. Din A 4 / waterproof black Fineliner / a round object you can use as an circle drawing tool (e.g. a cup) or optional a compass
[edgtf_icon icon_pack=“font_awesome“ fa_icon=“icon_star“ size=“edgtf-icon-tiny“ custom_size=““ type=“normal“ border_radius=““ shape_size=““ icon_color=““ border_color=““ border_width=““ background_color=““ hover_icon_color=““ hover_border_color=““ hover_background_color=““ margin=““ icon_animation=““ icon_animation_delay=““ link=““ anchor_icon=““ target=“_self“] Tipp
You can also use the doodling of these small mini mandalas as a good warm-up exercise before you begin larger creative works.
Since the doodling of the small mandalas is very manageable in terms of time and requires little material, you can also simply draw a small mandala every day as a daily ritual.
Doodling a Mandala-Pattern
Many small mandala doodles can be put together to form a larger work of art, resulting in a beautiful mandala pattern.
This free drawing is particularly suitable for allowing the imperfect and also accepting the „weird“ things in life.
[edgtf_icon icon_pack=“font_awesome“ fa_icon=“icon_pencil“ size=“edgtf-icon-tiny“ custom_size=““ type=“normal“ border_radius=““ shape_size=““ icon_color=““ border_color=““ border_width=““ background_color=““ hover_icon_color=““ hover_border_color=““ hover_background_color=““ margin=““ icon_animation=““ icon_animation_delay=““ link=““ anchor_icon=““ target=“_self“] Material
a sheet of (watercolor) paper (e.g. Din A4) / waterproof black fineliner
[edgtf_icon icon_pack=“font_awesome“ fa_icon=“icon_star“ size=“edgtf-icon-tiny“ custom_size=““ type=“normal“ border_radius=““ shape_size=““ icon_color=““ border_color=““ border_width=““ background_color=““ hover_icon_color=““ hover_border_color=““ hover_background_color=““ margin=““ icon_animation=““ icon_animation_delay=““ link=““ anchor_icon=““ target=“_self“] Tipp
These mandala patterns are a real eye-catcher on all kinds of media and materials.
For example, you can draw them on coloured backgrounds or photos, decorate wood with these mandala patterns or create your own fabric with them.
LEKTION 5
Now it’s getting colourful
Get to know your colouring materials
Now it’s time to colour your mandalas. There are many different types and materials you can use to colour your mandalas. I would like to introduce you to two great techniques that you can use to add colour to your mandala.
One medium we use to colour is the so-called brush pens, which are watercolourable, and the other medium is watercolour pencils, which are also watercolourable and give your mandalas a beautiful watercolour look.
For both products, there are numerous manufacturers and many colours and, above all, different qualities and prices. I am generally of the opinion to use higher quality products.
On the one hand, this has something to do with appreciating oneself and one’s art, but on the other hand, it also has to do with sustainability. Cheap products often have the disadvantage that they are either produced under bad conditions or are not of good quality. They break quickly, are difficult to work with and the colours are not as brilliant and fade quickly.
Nevertheless, especially in the beginning, when you are still trying things out, you don’t have to buy the most expensive professional products right away. There are many good products in the hobby sector. Besides, you don’t always need all the colours. It’s better to buy a few fewer pens of good quality.
Since I am giving you two suggestions on how to colour your mandala, I also recommend that you see if someone in your circle of friends already has certain pens or colours that you can borrow, so that you can try out what kind of colouring you like.
If you already have pens, I suggest using them to colour your mandala. There are different methods and materials to colour mandalas, but that doesn’t mean you have to use them all. I myself limit myself mainly to two types of colouring that I enjoy.
From my own experience I can say that you don’t need so many pens. It is much nicer to concentrate on one medium and technique and then to deepen and experiment with it and find your own style.
Creating Harmony with the Colours
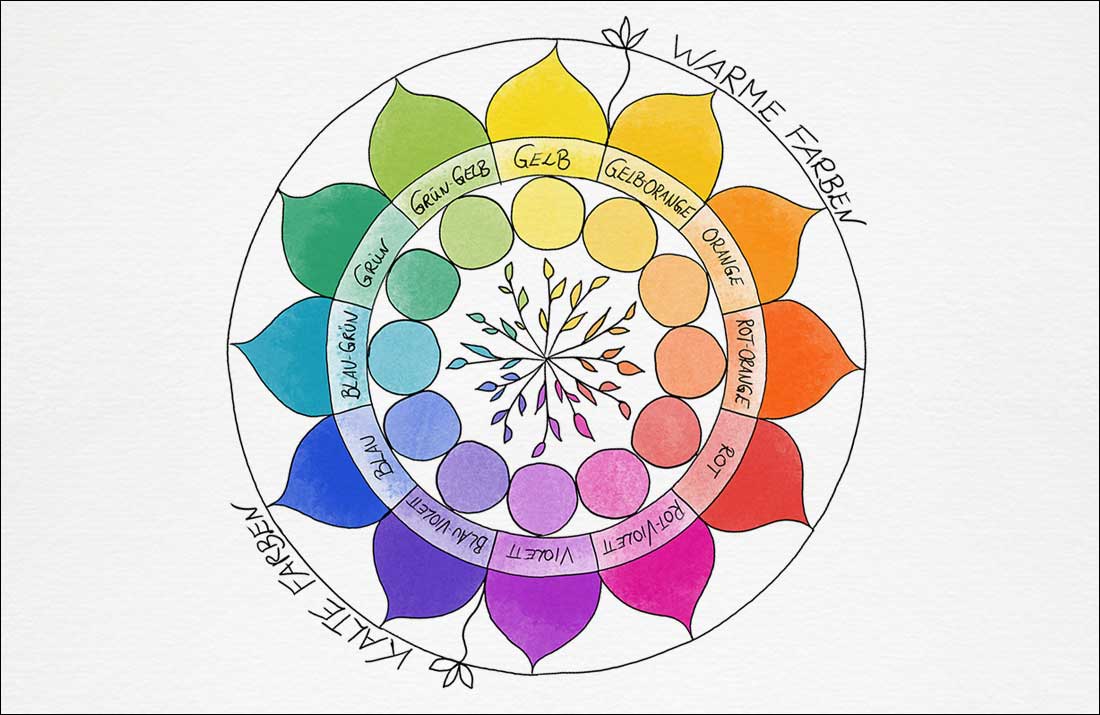
In general, a colour harmony is the aesthetic interaction of colours perceived simultaneously. Certain combinations create a pleasant balance in the viewer. There are various principles from colour theory for this, whereby colour harmonies are based on the colour wheel, which represents the relationships of the colours to each other.
However, colour perception is still very subjective and is strongly influenced by individual taste and mental state. Cultural circumstances and habits influenced by fashion also have an impact on colour perception.
I will now go into a few colour harmonies based on Itten’s colour wheel.
But feel free to choose your colours and decide from your gut which colours feel right for you at this moment.
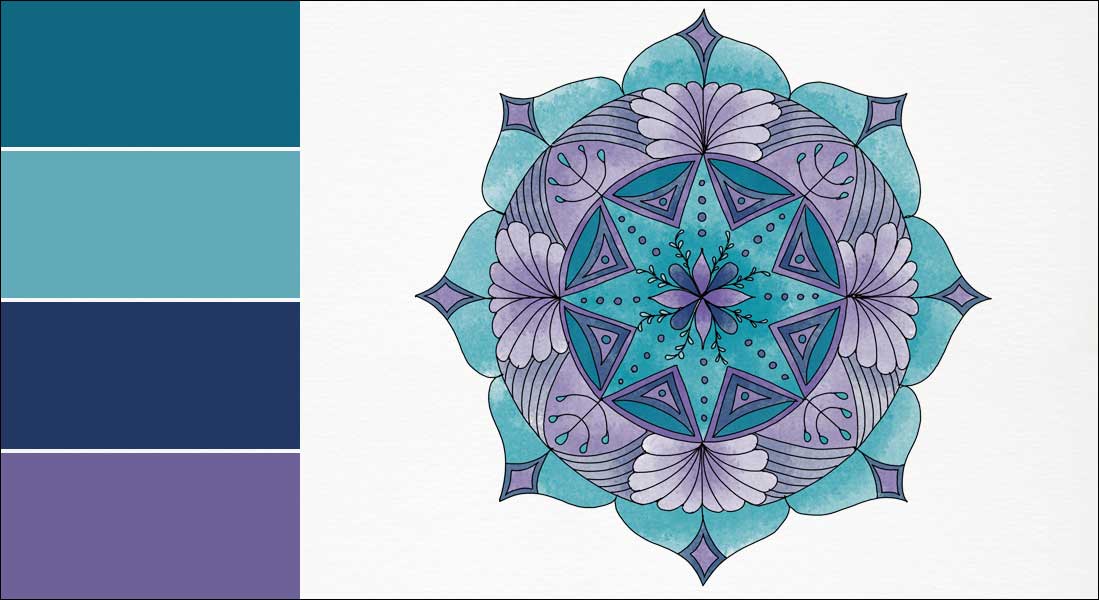
Cool and Warm Colours
Cold and warm colours can be separated in the middle of the colour wheel. The range of warm colours are the colours with yellow and red hues. The cold colour range includes the blue and bluish greens, which are perceived as cold. A colour harmony can be created by colouring your mandala only with warm or only with cold colours.
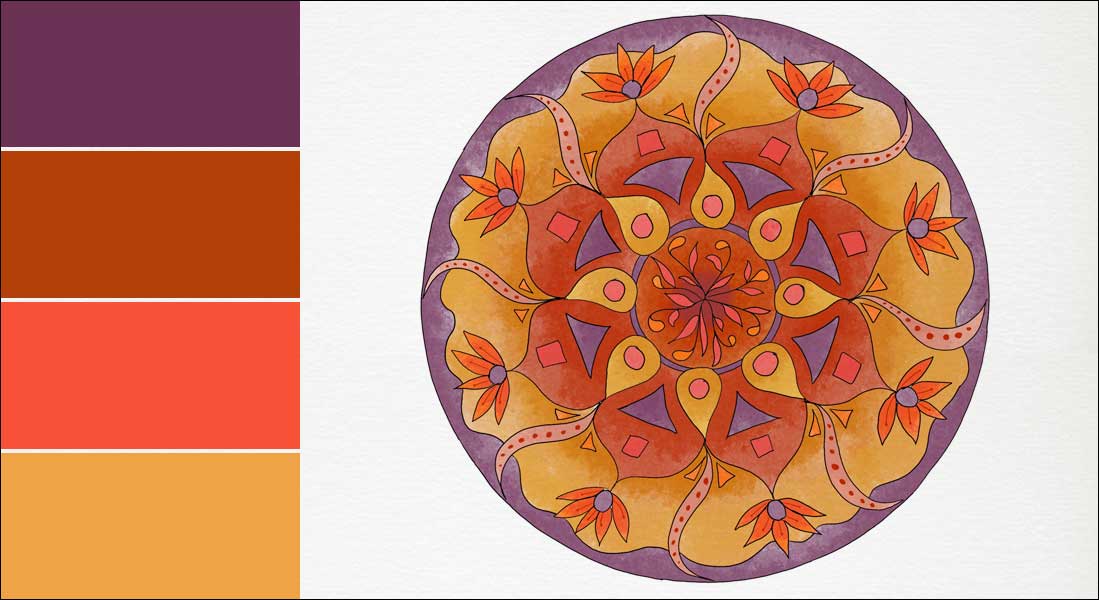
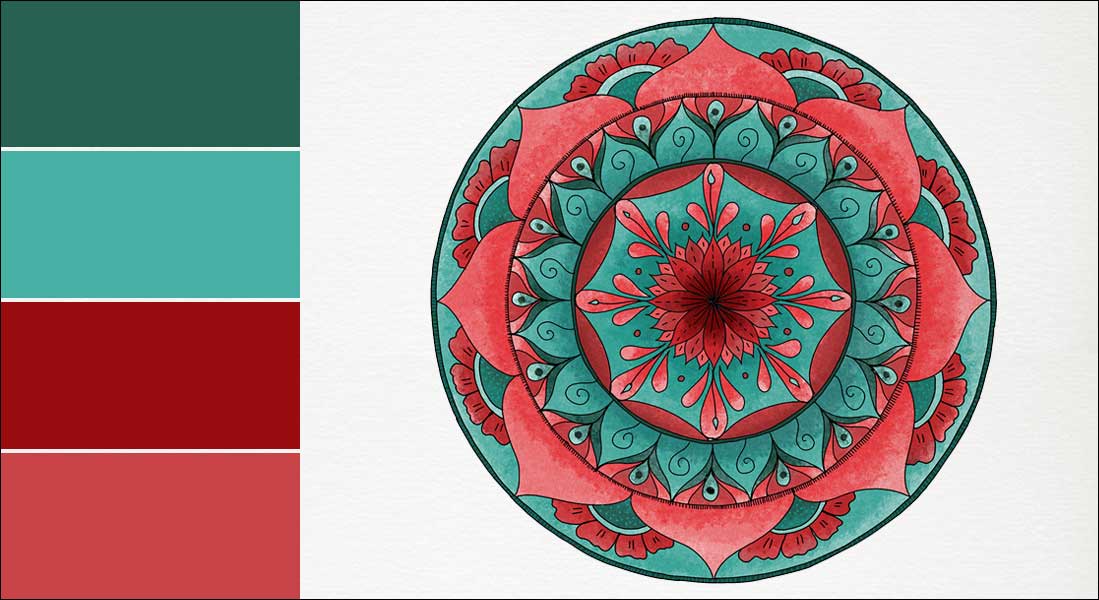
The interaction of Complementary Colors
Complementary colours are opposite each other on the colour wheel, such as red and green. Complementary colours mutually produce an amazing luminosity when viewed side by side. If you mix complementary colours with each other, they produce a „coloured“ grey.
Analogous Colours
Analogue colours lie next to each other on the colour wheel, for example blue, blue-violet and blue-green.
Monochromatic Colours
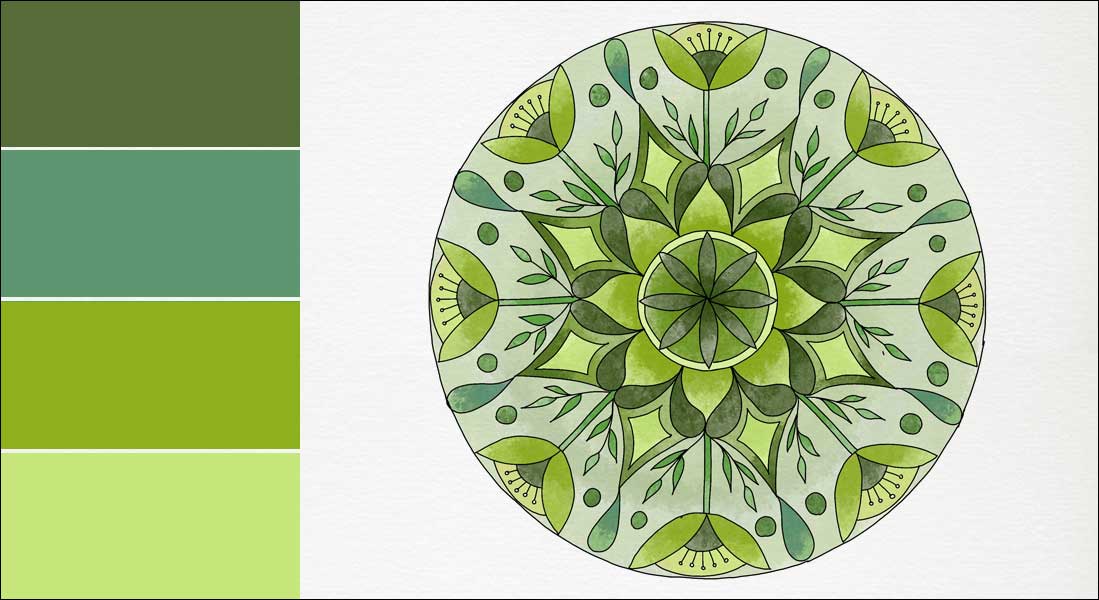
The monochromatic colour scheme includes different shades from the same colour family, such as greens.
[edgtf_icon icon_pack=“font_awesome“ fa_icon=“icon_star“ size=“edgtf-icon-tiny“ custom_size=““ type=“normal“ border_radius=““ shape_size=““ icon_color=““ border_color=““ border_width=““ background_color=““ hover_icon_color=““ hover_border_color=““ hover_background_color=““ margin=““ icon_animation=““ icon_animation_delay=““ link=““ anchor_icon=““ target=“_self“] TIPP:
If you feel overwhelmed by all this color options, just choose less colours, like three or four colours to colour your Mandala
Be brave and experiment, just let is flow.
Coloring with Watercolor Pencils
Watercolour pencils are a coloured pencil and watercolour paint in one. You can draw, paint and watercolour with them. With water and a few brush strokes, you can paint the colour application afterwards, as the pigments of the colour application dissolve with water and then behave like the classic watercolour paint.
Watercolour pencils are very user-friendly and are suitable for both beginners and professionals. They have the handiness of coloured pencils and at the same time the advantages of watercolours.
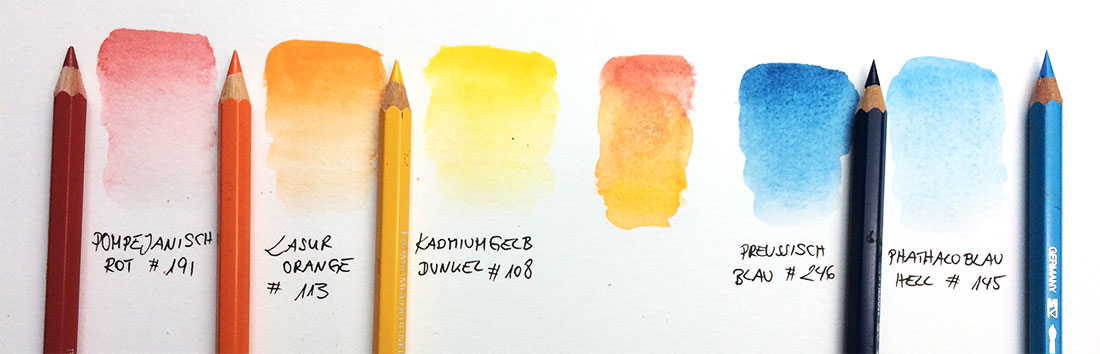
Again, there are many manufacturers that differ in price and quality, especially the colour intensity and light resistance differ greatly in watercolour pencils depending on the quality. High-quality watercolour pencils are lightfast and do not fade in the sun.
I use the Albrecht Dürer watercolour pencils from Faber Castell, which are of very good quality and lightfast. Moreover, Faber Castell is a company that actively opposes child labour and attaches great importance to sustainability. In addition, Faber Castell products are very easy to find here in the shops, even small creative and hobby shops often carry these pencils.
Watercolor Pencils:
Basic coloring techniques
[edgtf_icon icon_pack=“font_awesome“ fa_icon=“icon_pencil“ size=“edgtf-icon-tiny“ custom_size=““ type=“normal“ border_radius=““ shape_size=““ icon_color=““ border_color=““ border_width=““ background_color=““ hover_icon_color=““ hover_border_color=““ hover_background_color=““ margin=““ icon_animation=““ icon_animation_delay=““ link=““ anchor_icon=““ target=“_self“] Material
a piece of scratch paper from your Watercolor- or Mixed Media Paper / Watercolor Brush / Container with water / cloth ( tissue or cottoncloth ) / Watercolor Pencils
[edgtf_icon icon_pack=“font_awesome“ fa_icon=“icon_star“ size=“edgtf-icon-tiny“ custom_size=““ type=“normal“ border_radius=““ shape_size=““ icon_color=““ border_color=““ border_width=““ background_color=““ hover_icon_color=““ hover_border_color=““ hover_background_color=““ margin=““ icon_animation=““ icon_animation_delay=““ link=““ anchor_icon=““ target=“_self“] TIPP
Turn your pencil occasionally when colouring so that your tip wears evenly. As soon as you notice that your tip is too blunt and you can no longer draw fine edges, sharpen your pencils with a good sharp sharpener. Cheap sharpeners will break the tips and make the wood stringy.
You can easily control the pressure of the pencil and thus the colour application by changing the position of the pencil in your hand. If you hold the pencil farther forward, you automatically apply more pressure, if you hold the pencil farther back, it is much easier to draw with less pressure.
It is best to use a brush for watercolours, as the brush can hold much more water than brushes for other media. It is not necessary to use a human hair brush, the synthetic watercolour brushes are also very suitable.
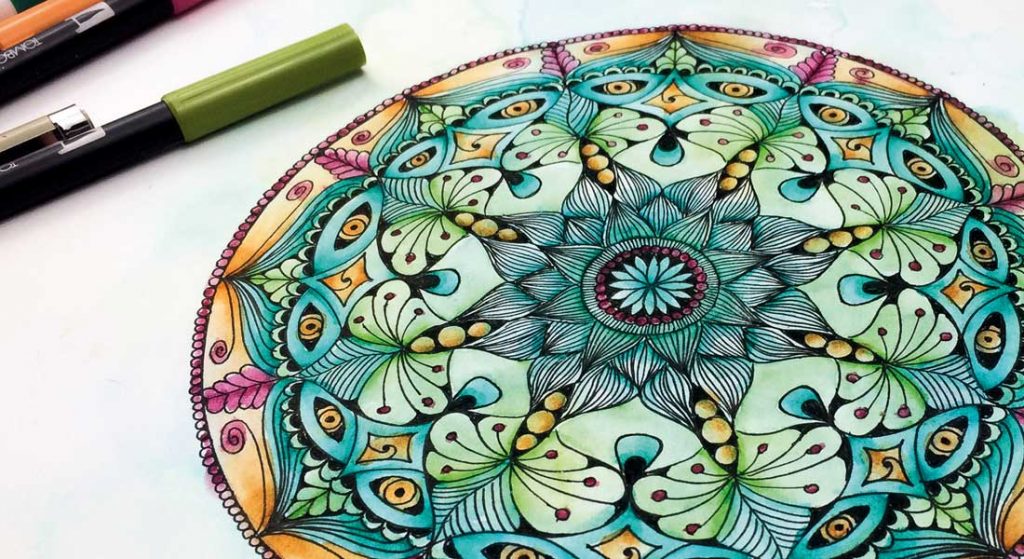
Coloring your Mandala with Watercolor pencils
Before I start colouring my mandala, I usually think about a small colour concept. This is not set in stone, but remains quite variable, because it happens quite often that I have a new colour idea during the colouring process, which I then follow.
At the beginning it is often more relaxed to already have a rough colour idea. In this case of my „sun mandala“, warm colours like yellow, orange and red tones immediately came to mind. But I also wanted contrasts. So I decided on a blue tone as a complementary colour to my orange tone and a green tone as a complementary contrast to my red tone.

[edgtf_icon icon_pack=“font_awesome“ fa_icon=“icon_star“ size=“edgtf-icon-tiny“ custom_size=““ type=“normal“ border_radius=““ shape_size=““ icon_color=““ border_color=““ border_width=““ background_color=““ hover_icon_color=““ hover_border_color=““ hover_background_color=““ margin=““ icon_animation=““ icon_animation_delay=““ link=““ anchor_icon=““ target=“_self“] TIPP
Try out your colours as gradients or combinations beforehand on a small scrap of watercolour paper, making sure it is the same paper you used for the mandala you want to colour. I like to label the colour samples because I keep these combinations as colour inspiration when I like them.
Now you are ready to go, in this video I show you how I colour my sun mandala with the watercolour pencils. As the colouring took 90 minutes, I have sped up the video a bit. In the second part I explain a few things that I noticed during the colouring.
[edgtf_icon icon_pack=“font_awesome“ fa_icon=“icon_pencil“ size=“edgtf-icon-tiny“ custom_size=““ type=“normal“ border_radius=““ shape_size=““ icon_color=““ border_color=““ border_width=““ background_color=““ hover_icon_color=““ hover_border_color=““ hover_background_color=““ margin=““ icon_animation=““ icon_animation_delay=““ link=““ anchor_icon=““ target=“_self“] Material
your Mandala / Watercolor Pencils / Watercolor brush / Container with water / cloth ( tissue or cottoncloth )
[edgtf_icon icon_pack=“font_awesome“ fa_icon=“icon_star“ size=“edgtf-icon-tiny“ custom_size=““ type=“normal“ border_radius=““ shape_size=““ icon_color=““ border_color=““ border_width=““ background_color=““ hover_icon_color=““ hover_border_color=““ hover_background_color=““ margin=““ icon_animation=““ icon_animation_delay=““ link=““ anchor_icon=““ target=“_self“] TIPP
Very wet areas should be left to dry a little to prevent the colours from running into each other.
Some reflection on the coloring process
Coloring with Brush Pens
Brush Pens are Pens with a brush tip. Depending on how much pressure you use you can draw very fine lines and thicker lines.
For colouring the mandalas I use brush pens that are watercolourable. However, most watercolourable brush pens are not lightfast, i.e. they fade over the years when exposed to sunlight.
As the pens are usually also available individually, try out different pens to find your favourite.
Brushpens:
Basic coloring techniques
[edgtf_icon icon_pack=“font_awesome“ fa_icon=“icon_pencil“ size=“edgtf-icon-tiny“ custom_size=““ type=“normal“ border_radius=““ shape_size=““ icon_color=““ border_color=““ border_width=““ background_color=““ hover_icon_color=““ hover_border_color=““ hover_background_color=““ margin=““ icon_animation=““ icon_animation_delay=““ link=““ anchor_icon=““ target=“_self“] Material
a piece of scratch paper from your Watercolor- or Mixed Media Paper / Brush Pens from one color familie, e.g. a dark pink, a gaudy pink and a rose tone / Aquabrush Pen or watercolor brush and a container with water / cloth ( tissue or cottoncloth )
[edgtf_icon icon_pack=“font_awesome“ fa_icon=“icon_star“ size=“edgtf-icon-tiny“ custom_size=““ type=“normal“ border_radius=““ shape_size=““ icon_color=““ border_color=““ border_width=““ background_color=““ hover_icon_color=““ hover_border_color=““ hover_background_color=““ margin=““ icon_animation=““ icon_animation_delay=““ link=““ anchor_icon=““ target=“_self“] TIPP
When you mix two colours together without using water, the double application of paint can cause your watercolour paper to loosen and roughen a little, so be very careful with the application of paint when using this method.
When using this method of mixing without water, it is also recommended to use thick paper with a smoother surface, such as Bristol paper.
Coloring a Mandala with Brush Pens
As with colouring with watercolour pencils, I recommend that you first apply a few colour samples to watercolour paper. Especially the brush pens often look different on paper than the pen cap and with the activation of water the colour changes again a little.
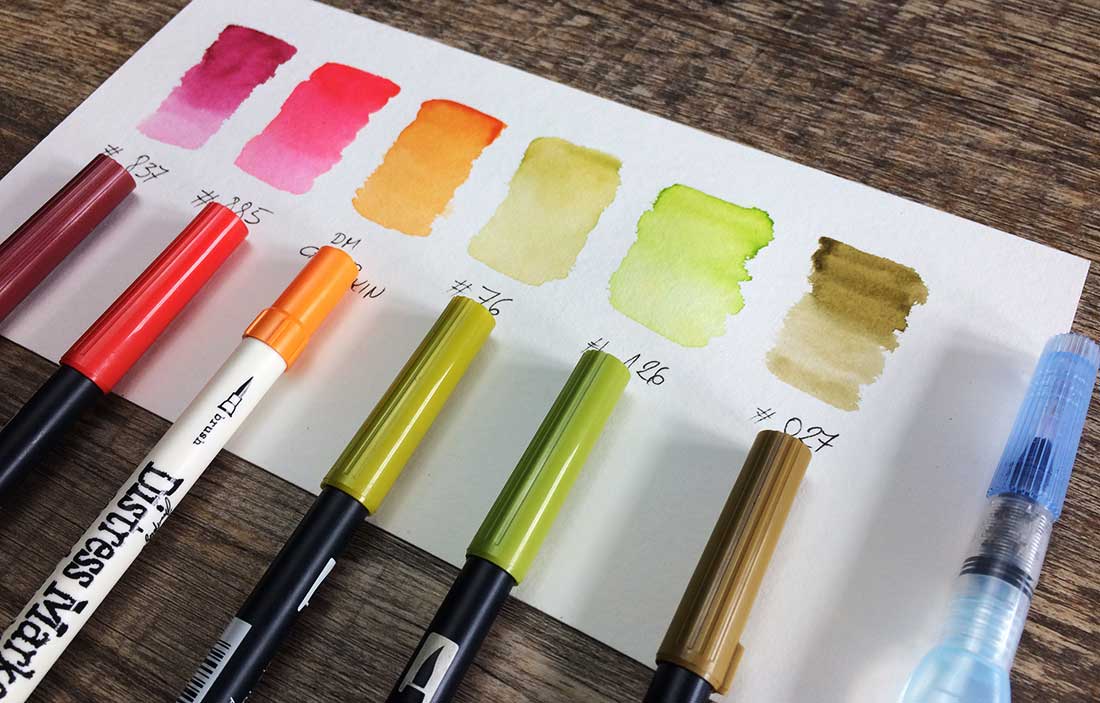
[edgtf_icon icon_pack=“font_awesome“ fa_icon=“icon_pencil“ size=“edgtf-icon-tiny“ custom_size=““ type=“normal“ border_radius=““ shape_size=““ icon_color=““ border_color=““ border_width=““ background_color=““ hover_icon_color=““ hover_border_color=““ hover_background_color=““ margin=““ icon_animation=““ icon_animation_delay=““ link=““ anchor_icon=““ target=“_self“] Material
your Mandala/ Brush Pens / Aquabrush Pen or watercolor brush and a container with water / cloth ( tissue or cottoncloth )
Some reflection on the coloring process
Namaste
Thank you for letting me accompany you on your journey into the world of mandalas. I wish you much joy, contentment and a relaxed time creating your mandalas.
Here is a small time-lapse mandala video